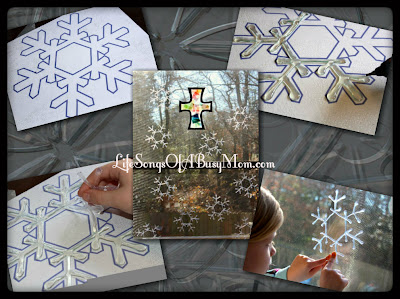
Glue Gun Snowflakes Tutorial
Brassy Apple (Love her btw) posted a link on her Facebook the other day about snowflakes that are made from a glue gun.
I felt inspired to try them out myself since I already own a bunch of glue sticks and glue gun. I also let my daughter join in on the fun.
The tutorial I read has you actually putting your hot glue right onto your window. I was a little leery of this since hot glue can break a cold window, so I decided I needed to find a different way of making them. Here's how I did it:
Here is what you'll need:
1. A piece of clear glass (I used one from on old frame that I wasn't using)
2. Glue gun (preferably low temp, however mine is high temp)
3. Lots of glue sticks
4. Non Stick Cooking Spray (Like PAM)
5. Paper towel
6. Snowflake template: Click HERE
- Print out a snowflake template and place it under your piece of glass.
- Very lightly spray the glass with some non stick cooking spray (This will make peeling the snowflake off of the glass a breeze, and also creates suction when you place the snowflake on your window).
3. Trace your snowflake with hot glue. Make sure to make it pretty thick.
(An optional step could be adding glitter while the glue is still hot or even using glitter glue sticks)
4. This is where your little one can help. Gently peel off the glue snowflake.
5. Place your snowflake on a paper towel and rub the excess oil off. (Do this by sliding the snowflake from side to side on the paper towel.
6. Have your child place the snowflake on a window and gently press to stick.
There you have it! Make as many snowflakes as you want, or even print out different snowflake patterns to mix it up a bit. You can also talk to your children about snowflakes and how each one is different. Talk about how they're made. Make it a fun, learning experience! :)
I hope you enjoyed this tutorial and please feel free to share or pin on Pinterest! :)


.jpg)


Mandy, this is a fabulous idea! Thank you! My sister was asking me to buy her some of those jelly window clings because her 19-month-old likes touching them on their windows. This will be a perfect alternative to that AND provide us with some quality bonding time while making our unique snowflakes. :) Thank you!
ReplyDelete
ReplyDeleteThat is a great idea to use Pam! I may have to try that next time I do it!
<3 Hannah via We Lived Happily Ever After
Love this post! Great idea to use a stencil behind the glass. I tried something similar on my blog but with drinking glasses - great for a party - http://harlowandthistle.blogspot.ca/2013/12/diy-christmas-cocktails.html
ReplyDeletelo e your idea i did the snowflake but wont stick on my window it stuyck then fell off right away can ya help me thanks pat
ReplyDelete